Thursday 24 September 2015

TBT - Tumbling Down

One day, when I'd been quilting for about 4 years, I decided I wanted to make a quilt using baby blocks (or tumbling blocks, as I always call them).  This seemed like a simple enough idea, but I wanted to mix it up a bit by making a design that looked like the blocks were falling.  So, one weekend I dug through my scrap bins, and pulled out a bunch of fabric combinations that I could use for the blocks. I decided to make each block in 3 shades of a colour, and arrange the multiple colours randomly in the layout.

Y-seams?  No problem. I figured I could handle that. I'd done at least one quilt with mitered corners by then, I think.  So I cut a bunch of my scraps into little 2 inch diamonds, and laid some out on my design wall. My vision had the blocks on a dark background, but the fabric I pulled for that did not work at all, as you can see.  So I figured I'd be working with white.  Despite that, I went ahead and started assembling.  First I made a bunch of baby blocks.  Joining 3 diamonds from a colour set, carefully keeping the orientation of light/med/dark the same for each block.  I knew if I tried to do this by hand I'd never finish, so I went ahead and pieced all those fun y-seams on my sewing machine.

After the initial layout shown above, I did some calculations based on the size I thought I wanted (30x40").  Those calculations said I would need 160 blocks for my quilt.  Since at that time I had about 43 blocks done and another 20 cut out, I was pretty down about the amount of work I'd bitten off with this project.  Nevertheless, I soldiered on. 

When I'd finished about 75 blocks, I put them up on my design wall, to have a look at the overall design I was aiming for.  I figured out 2 things at this point. They REALLY needed a dark background.  And I probably had enough blocks to do what I wanted.  So I picked up a black fabric for the background - a bit darker than the original fabric I'd pulled up top - and decided I just needed to ensure that my really dark blocks didn't directly touch the background.  Simple enough.

Then I looked at my lovely falling blocks.  I thought at first I could keep the orientation/location such that I could piece them between black hexagons, and keep things simple. But I quickly decided that this would make the quilt too rigid. I needed it to flow more, so I 'd have to deal with some free-form falling blocks to make that happen.  I did not want to applique them, because I felt that would detract from the look of the quilt. So I did some free form piecing, instead.  This worked reasonably well. I simply added black background around each falling block, until I could trim that to the right angle to allow me to join the pieces into the quilt.

This worked great, until I got to the lower right, where I wanted blocks to overlap each other. Things got a bit trickier there.  I made it work, piecing blocks on top of eaach other. There were some pretty hairy corners to deal with, but I persevered (because I didn't know enough to realize how difficult I was making my life). And I even kept the line for the border pieces running through behind the block set in the lower right.  That was maybe a wasted effort, since you can barely see where the border pieces are, but I was pretty proud when it was done.

I quilted the blocks in the ditch, did some stipple in the background, and left the borders unquilted.  Definitely some choices I would change if I was doing that again, but at the time I was still pretty new to free-motion quilting.

This is still one of my favourite quilts, and it hangs in my bedroom over my bed.  I received lots of compliments online and requests for a pattern, so I finally wrote that out this year, and posted it for sale on Craftsy.  And this year, I entered this quilt in the Richmond Fair, where it received 2nd prize in a wallhanging category.

Please join me for Throwback Thursday today. The rules are simple (and flexible :) ). Write a post (or revive an old one) about an old quilt or project that you have - maybe something from your pre-blogging days, or just a project you love that you want to show off again. Please include a link back to this post in yours, and when you link up make sure you are linking to your specific blog post, not just your blog address. You want to make sure people can find your post if they drop by the linkup later.

Add your link, and check out some of the other links for some inspiration. See my sidebar for a TBT button you can add to your blog.


Monday 21 September 2015

Design Wall Monday

There hasn't been any change in my design wall lately.  I've been distracted by the beautiful weather we've been having.  However, judging by this morning fall has arrived and I can expect to be hibernating inside, away from the cold, before too much longer. That should provide a boost to my quilting time :)

For now, my design wall still has my twister top, and reflection quilts on it.  I'm in the middle of binding some quilts for Victoria's quilts, and have another couple to get through the longarm this week.  But I hope to get back to some activity in my sewing room before too long.


Thursday 17 September 2015

TBT - Mini Delight

It's time for another edition of Throwback Thursday!  Please join me (see links at the bottom) and show off one of your earlier projects.

A few years ago, I made a quilt for my sister. I blogged about it here .  My sister had hinted strongly that she wanted a quilt (I believe the phrase was "Where's mine" when I gave one to my mother :) ).  So I found a picture of a quilt I liked, drafted a pattern, since all I had was the photo, and made dozens of blocks with triangles made from temples.

When the quilt was complete, I had a few blocks left over from my intial attempt.  I didn't like the original colour choices, so I started over with new fabric, but I had these blocks already made.You can see that some of the fabric stuck, but the green and medium purple were replaced in the final quilt.  But, I had these blocks, so I wanted to do something with them.

I made a few more blocks with the fabric I had left. Since I had no more of the background fabric, I switched the orientation around, to change up the design and allow me to use other fabrics as the background. The cream became the focus of the block. I added some borders, and made this into a quiltie-sized top, so that I could donate this quilt.

Then, I quilted the top on the frame I had made for my domestic machine - I think this was the last one I quilted there, before giving up that endeavor.

This quilt was about 24" square in the end, and was donated to the local children's hospital through a guild Quiltie program in Oct 2009.  Because the large quilt for my sister was named "Triangle Delight", I called this one "Mini Delight".


The rules are simple (and flexible :) ). Write a post (or revive an old one) about an old quilt or project that you have - maybe something from your pre-blogging days, or just a project you love that you want to show off again. Please include a link back to this post in yours, and when you link up make sure you are linking to your specific blog post, not just your blog address. You want to make sure people can find your post if they drop by the linkup later.

Add your link, and check out some of the other links for some inspiration. See my sidebar for a TBT button you can add to your blog.

Tuesday 15 September 2015

Quiet week

I've been busy with my longarm this week, and prepping a few quilts for a show (adding labels/hanging sleeves), so not much has been going on in my sewing room. I did start on this block - which needs to be finished by tomorrow night.  Nothing like working to a deadline :)

But other than that, things are quiet here.  I have some more tweaks to make to my dress, but after that hopefully I'll get back to quilt making.

Saturday 12 September 2015

Reflections

Reflections
I've been working on a little sample quilt, trying out a theory to see if it would translate into fabric.  Surprisingly, it worked out almost exactly like I had hoped.  It is another effort that shows up best in photos (or from a larger distance), but I'm pretty happy with the result.  In the first half of the assembly, I was pretty careful about the flow of the shimmer, but I see at the end I got careless and simply staggered each row back and forth.  That will have to be fixed for the final quilt.

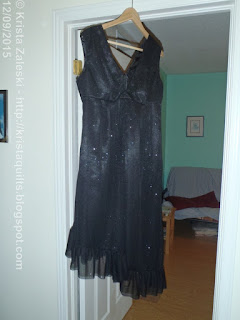
The other thing that's been occupying my time this week is a revival of my sewing skills from 20 (or more) years ago.  I had the foolish idea to make a dress for a dance party I'm going to next month. The theme is formal, but I'm dancing Bolero so I needed something that was somewhat of a crossover.  Nothing in my closet suited, so I thought I'd try my hand at this.  The picture is awful, but I'm pretty pleased with the dress. A couple of tweaks still needed, but I think it will suit just fine.  And now I'm on a mission to find the dress form my mother used to have.  That would have made this process much simpler.


Thursday 10 September 2015

TBT - Bargello

It's time for another edition of Throwback Thursday!  Please join me (see links at the bottom) and show off one of your earlier projects.

One day early in my quilting career, I was browsing quilts and came across a bargello. That technique immediately went onto my "someday" list, as something that I wanted to try.  A while later, I splurged on a book about bargello quilts, and how to design them. I did some reading, and in September of 2009 I took the plunge.  I picked up some fabric in my favourite turquoise colourway, and came up with the concept of a water scene for my bargello.  I sketched it all out, just like the book said, and started cutting strips.

I was a little leary of the method used in the book I was reading, for assembling the bargello. It had you stitch each line of the design directly to the batting/backing. So essentially a quilt as you go bargello. I still don't know if that's the usual method, but I admit that it kept things straight and square quite nicely.

When I laid out my strips, based on my design, I was not happy at all with the results. I'm not sure what didn't translate, from paper to fabric, but this first cut wasn't working. So I played around, rearranging strips.  I had to work with what I had, as all the fabric had been used already.  A few tweaks over the next couple of days resulted in something that I felt resembled a waterfall, as I had wanted.

This quilt was slowly assembled over a couple of months, and finally finished in January 2010.  The advantage of the assembly method was that when the top was assembled, it was already quilted. All I had to do was add the borders, and quilt the large border so it would stay nice and flat.

I still want to make another bargello one day - something a bit more adventurous with an interweaving design.  But while they are beautiful quilts in the end, the assembly process is a bit repetitive and I think that's what has kept me away from another attempt thus far.

The rules are simple (and flexible :) ). Write a post (or revive an old one) about an old quilt or project that you have - maybe something from your pre-blogging days, or just a project you love that you want to show off again. Please include a link back to this post in yours, and when you link up make sure you are linking to your specific blog post, not just your blog address. You want to make sure people can find your post if they drop by the linkup later.

Add your link, and check out some of the other links for some inspiration. See my sidebar for a TBT button you can add to your blog. 


Tuesday 8 September 2015

if you don't like it, change it

During my finishing blitz this past weekend, I quilted and bound one of the convergences quilts I made a couple of weeks ago.  I was not completely happy with the end result of this quilt. I had envisioned a sunset kind of image, and it just wasn't quite coming through, no matter which direction I looked at the quilt.

After I finished binding it, I had another look, and inspiration struck. I added some applique, carefully positioned to hide the transitions I didn't like in the quilt.  And voila!  I think it really does look like a boat sailing at sunset.  Now I just have to figure out how to fasten that applique, without destroying the quilt.

Right now, it's cut as raw-edge applique, but that means stitching through all layers of the quilt, and showing the outline on the back. Or, I could possibly recut and do needle-turn applique, where I could bury the stitches and leave the back pristine.

I suspect simplicity will win out, but I'll let it stew for a few days before I commit.


Monday 7 September 2015

Design Wall Monday - Sept 7

Still the same projects in progress on my design wall. No new scrappy pineapple blocks got made, no progress on my twister. I did add a couple of rows to my skyline relfection. And realized that I completely forgot to reverse the image for the reflection part :(  So a bit of juggling there, but I'll be able to make it work, thanks to all the cutting I was doing anyway.

My efforts this weekend have focused on finishing some projects.  I made really good progress, even if most of them are just little baby quilts.  First, Fox and Friends got quilted. This one is now done, because someone else will bind it. 

I quilted my Modern Rainbow quilt. Just need to bind it today to consider that a finish.  I'm not too happy with the back (it's not lying as flat as it should be - definitely a case of why one should always quilt from the center out) but the front makes me very happy.  And my extra layer of fabric on top of the batting seems to have completely resolved the issue of the colour showing through from the back. See this for my earlier post on that topic.

And I quilted and bound a few donation quilts.Not my best work, but hopefully they'll brighten up a room and keep someone warm this winter.


Drop by Judy's blog for more design walls today.

Sunday 6 September 2015

Stash Report - Sept 6

I have lots to report out of my stash today.  I've been busily working on a few of my own tops, to get a few finishes under my belt while I have a lull in customer work on my longarm.

I quilted 4 small tops this weekend, and put binding on all of them plus one larger top.  That's 4 yards for backings and 1.75 yards for bindings.  And I have my Modern Rainbow on the longarm now, which used another 2 yards for backing plus 2 for a liner to keep the back from showing through to the front.
That's a total of 9 3/4 yards out this week (I do love counting backs :) )

Stash totals for the year:
95 3/4 yards in
205 1/4 yards out
Total: 109 1/2 yards out

Drop by Judy's blog for more stash reports today.


Friday 4 September 2015

UFO Busting report

I fell off the bandwagon for Vicki's UFO busting party the past few months, but I was reviewing my current status and thought it was time to check in again.,

I'm pretty happy with where things are, although the numbers don't show it.  In March, when I posted last, I had 26 tops, plus 8 being pieced in progress.  A pretty daunting number I must say.

Today, that number doesn't look so different:  As of Sept 1 I have 27 tops waiting for quilting, 1 quilt to bind, and 11 piecing projects in progress.

The good news is the change in those tops.  Of the 26 tops I had in March, I have finished 16.  Plus I started and finished 6 quilts.  OK, apparently I added 17 new tops and a few new projects, for a net gain in UFOs.  But it still looks like progress to me, with 16 quilts completed since March :)

Yesterday, I decided it was time to make some more progress, so I put a few tops on my longarm and went to work. First, I finished up Fox and Friends, since that one needs to be ready for a class this month.  The background is quilted in spikes, and all the animals are outline quilted in matching thread.

Then, I sewed together a bunch of backings, and loaded 4 small tops.  I stuck with my favourite pantograph for baby quilts (Cloud 9) and used up some leftover bobbins I had from previous quilting activities. All my new convergence tops and a little snowball/9-patch are now quilted and ready for binding.

Current UFO count, for Vicki's stats:

# Projects In Progress March 31 - 26 tops, plus 8 being pieced
# Projects Completed - 22
# new projects started - 20
# UFOs trashed - 0
# projects in progress August 31 - 27 tops, plus 11 being pieced and 1 to bind

Thursday 3 September 2015

TBT - Cambridge Blues

It's time for another edition of Throwback Thursday!  So sorry for missing last week, but I'm back and hopefully going to keep better track of my calendar :)  Please join me this week (see links at the bottom) and show off one of your earlier projects.

Back in the late 00's, theQuilt.com ran a charity auction every year, and all proceeds went to cancer support services.  Every year, I tried to ensure I had a quilt to send to them, and usually I tried to use Northcott's "Quest for  Cure" fabric line, because that seemed appropriate for the theme of the auction.

In July of 2009, some of the local quilt shops hosted a shop hop. As part of that, they each sold a kit for 1 part of a mystery quilt. The shop hop was a "Quest for a Cure" shop hop, and the mystery quilt was made from fabric from Northcott's Quest for a Cure "Cambridge Square - Blue" fabric line.

Following a 3 year tradition, I decided to participate in the mystery, and donate the resulting quilt to thequilt.com. I had donated a quilt every year for the previous 3, and always tried to use at least some fabric from Northcott's current "Quest for a Cure" collection in the quilt I donated. So, this was a perfect starting point for my next donation, and I picked up all the kits on my tour.

Unfortunately, the first 2 parts of the mystery which I attempted were both short on fabric. A rather disappointing start. I debated my options: give it up as a lost cause; purchase an additional fat quarter of each of the 6 fabrics I was (so far) short on; or try to make something from what I had. I chose option 3. I gave up on the "mystery" aspect, and pulled out all the fabric and directions for the quilt. With a bit of creativity, I rearranged the colour scheme into something that was mostly achievable with the provided fabric. I picked up one extra matching fat quarter, and continued on my way.

In the end I was quite pleased with the result. I ended up modifying the layout somewhat, but the changes from the original design are hardly noticeable if you don't have the original in front of you. The shop hop was a lot of fun - it was one of my first, and introduced me to some new stores in town. It also gave me an excuse to spend a day with a quilting friends, which is always a good time :)  

This quilt was quilted on my domestic machine with a meandering pattern, and then sent off to theQuilt.com for the 2009 auction.  

The rules are simple (and flexible :) ). Write a post (or revive an old one) about an old quilt or project that you have - maybe something from your pre-blogging days, or just a project you love that you want to show off again. Please include a link back to this post in yours, and when you link up make sure you are linking to your specific blog post, not just your blog address. You want to make sure people can find your post if they drop by the linkup later.

Add your link, and check out some of the other links for some inspiration. See my sidebar for a TBT button you can add to your blog. 

Tuesday 1 September 2015

September!

Ah, September. It's hard to believe it's here already.  My son heads back to university today, the days are getting cooler (or they were - 30 degrees Celcius is the high for today), nights are getting longer.  And I noticed deads leaves falling from my trees on the weekend. Looks like fall has snuck up on us again.

It looks like I'm going to have a bit of a lull in my longarm quilting business this month. I hope not to let that time go to waste, and use it to catch up on a few of my own projects.  I'm actually quite proud of my accomplishments this year so far. Of the 22 quilt tops I had at the start of the year, 1/2 of them are now completed. Of course that doesn't mean I didn't add just as many new tops waiting to be quilted - but at least they are newer projects :) 

This month I hope to quilt a number of these tops. First, I have to finish two new ones, for classes I'm going to teach this fall and next winter.  Then, I'll see how many others I can complete before Christmas quilts start coming in from clients.  A smart person might pull the oldest tops and do those first, but I suspect I'll take the easy route and pull out all the small tops I have piled up recently.  Instant (or faster, anyway) gratification that way.  These pictures are the next two finishes you should see from me, if I stick to the plan.