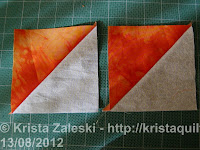
I don't know about you, but I hate dealing with triangular pieces of fabric, particularly when makings half & quarter square triangles. The pieces always want to stretch along the bias. So, here is an easy tutorial on making those from squares, instead. With no waste.
Easy half-square triangles
Cut a square of each fabric you will use for your half-square triangles. Using the tip above, the size of your squares should each be the finished size of your block plus 7/8 of an inch. So, if you want 3" half-square triangles, cut a 3-7/8" square from each of your 2 fabrics. Lay these right sides together, and mark 1 diagonal. Then, stitch 1/4 inch away from your mark on both sides of the line.
 Cut along the marked line, press open, and voila! Two perfect half-square triangles.
 Easy quarter-square triangles
For quarter-square triangles, the process is basically the same. But, cut your squares 1-1/4" larger than the finished size of your quarter-square triangles. So for 3" finished size, cut two 4-1/4" squares from your fabric. Again, place the fabrics right side together, mark and stitch on either side of your diagonal line. Cut and press.
 Now, take your 2 half-square triangles, and line them up right sides together. Make sure you match the seams, and place the dark side of one square on top of the light side of the other square. Once again, mark the diagonal, stitch, and cut.
Press open and you have 2 quarter square triangles.
But what if you want more colours in the quarter-square triangles? Simply make yourself 2 sets. Cut, for example, 4 squares of fabric in 4 different colours. Pair them up, and create the half-square triangle intermediate step for each of the sets. Now you have 4 half-square triangles. Match them up in pairs again, mixing the colours up as you wish. Stitch and cut, and you have 4 half-square triangles containing up to 4 different colours. The only catch is that you will end up with mirror image blocks - so if colour placement (with 4 colours) is important, this method may not work for you.
The biggest bonus with this method is perfect points. You are never matching points at all - you match seams across your half-square triangles. If you press those seams correctly (I prefer to press all seams towards the dark side of the half-square), they nest together and you get perfectly matched points with no fuss.

"But, cut your squares 1-1/4" larger than the finished size of your quarter-square triangles. So for 3" finished size, cut two 1-1/4" squares from your fabric."
ReplyDeleteShouldn't you cut two 4-1/4" squares, if your goal is to have a finished 3" square?
Yes, you are correct. In 7 years since I posted that, no one has ever noticed :) It's fixed now.
Delete